Search This Blog

Thursday, December 27, 2012

Bats and Spiders

     I can't believe its the end of December already.  The time has gone by so fast and I haven't posted since the start of the school year.  I have only one word for why I haven't and it is PINTEREST.  I just love it and I have 40 boards and over 3000 pins.  So, needless to say I've been neglecting this blog.  I'm going to try to make some power posts these next few weeks and try to catch up to where we are in my classroom iPad use.
     I live near the University of Virginia and we are very fortunate to have pre-service teachers come learn and help out in our classrooms.  This past fall, I had a technology student come and work with my kids.   We were learning about "Bats and Spiders" around Halloween time, so I decided it would be a great intro to the world of iPad productivity for both the kids and the UVA student.  The finished product used 3 apps along with photos found on Safari.  The kids searched in Google images and learned how to save their favorite spider and bat photos onto their iPad.  My UVA student, Mayan Elgort, made a fantastic YouTube about the journey, so I'll let the video explain the learning process we all went through. This is my first attempt at including a video into a post, so I hope this works out.  Enjoy!


The three apps we used: click on the names and it will take you to the iTunes Store. 

    PhotoWall


Sunday, September 2, 2012

It's A New School Year!

The new year has begun, so I'll now be able to blog about my full implementation of my 1:1 iPad experiences.  We have been in school for 8 days and we have been on laptops a couple of times, but I haven't brought out the iPads just yet.  My hope is that will happen next week.  For now, I want to show you how my classroom is set up.  I thought about the learning spaces in regards to the kids using iPads.  I'm pretty pleased with the results.  I probably have too much furniture, but I can't give up anything just yet.  

I love the kid size picnic table and lawn chairs, so do the kids!


A fun, comfortable place to sit low and work.

The kids circle time and my whole group teaching area.

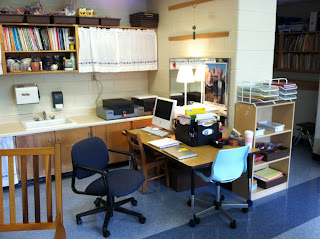
My space that the kids share with me.  The iPad syncing trays are on the counter to the right.

Our classroom library, but there are books all over the room.

What the kids see as they enter the room

Another view.
I know the pictures may be a bit overkill, but I love the classroom space so much I wanted to share.  I'm excited to get past the fun of the start of the school year into the comfort of routines.  Stay tuned....... 

Saturday, June 9, 2012

The Desert

During this past school year, I tried something new with the way I teach Science and Social Studies.  Instead of teaching each "unit" in isolation, I began to teach everything all tied together.  This needs some explaining.  Each Friday we "travelled" to a different destination using Google Earth and Google Maps.  The destinations were tied in to different SOL's that I have to teach.  An example of a destination was Washington, DC.  The different SOL's that I taught we patriotism, plants, animals, people and their contributions, seasons, and maps/globes.  The students were incredibly engaged and looked forward to our Friday trips.  We packed our suitcases and used our map reading skills each time.  When the iPads arrived the students were then able to go onto Goole Earth themselves and they got to decide how they wanted to view the destination.  They also went on Safari and did google  searches for the plants and animals.  They loved looking at the pictures and videos when appropriate. So there is the explanation, now on to how we used the iPads.


When we travelled to the desert, we went to Arizona (it's amazing what you can see from Google Earth!).  We then looked at images of the plants and animals found in deserts using Safari and Google images.  I showed the kids how to save an image and told them to save their 3 favorite plants and their 3 favorite animals. Again, their engagement in this activity was so much fun to watch.  Their interactions with each other was also a delight as they found really cool looking animals and plants and shared them with their friends.  It was also amazing to hear them explaining and navigating with each other on how to find all the different images in the site. 

Then we began working on creating a page using both images.  Using the Photo Wall Pro app, I showed the kids how to insert their favorite plant picture from the one's they saved from Safari into the background of a Photo Wall page.  Then the students picked the animal they wanted to put onto their page and inserted it in the foreground.  The background picture fills the whole frame but the foreground picture allows for manipulation.  They could decide the size and transparency of the photo and where they wanted to place it onto the background.  They were becoming page designers.


Photo Wall pro is a versatile app.  You can design with photos and you can type right onto the page.  The kids had already written information they had learned about traveling to the desert onto a graphic organizer they were used to using.  They were also familiar with typing on the iPad from other books we had made, so the transition to this apps typing feature was very easy.  Here's an example of a page: 


The great thing is that as the kids type, the app will show suggested spellings which again opens up a lot of discussions among the kids.  I've taught them to look at the word and read it.  Then they decide if they like the suggested spelling and if they want to use it.  The conversations about this was great and kids were reading and really thinking about the spelling.  I found that they stopped asking me to spell words for them, (which I never would do anyway, but they always asked!).  When they were through with their page, they had a friend edit it for them and then they showed it to me. 

When we were all finished, I had the kids e-mail the page to me so I could print them out and we made a class book.

This was a great app find and I have many ideas for other projects that I will post now that I have more time.  The kids are becoming so independent with the iPads and they are incredibly engaged in their learning.  I am finding that they are becoming very self directed in their learning and they are coming up with new ideas and ways to show their learning that is fun for them. The more I use these iPads in the classroom the more I am convinced that the iPad is a very crucial tool for learning in the primary classroom.

Tuesday, May 8, 2012

Paper-Less Class Lesson

When I wrote my grant one of the outcomes I was looking for is to become a paperless classroom.  This was my first attempt at going paperless with a lesson that usually involves several sheets of paper over time: Counting Large Numbers.

I started out reading the book "April Rabbits" by David Cleveland to the class.


I had taken pictures of the last 10 pages and made sure that each iPad had one on it. When I took the picture, I made sure that none of the text was showing as I didn't want the students to see the number of rabbits that was in the illustration.  My intention was for each child at a table to have a different picture than the other table members.  After reading the story and having fun with it, I told the students that they would be counting rabbits themselves.  I showed them a picture of one of the pages I had on my teacher iPad.  


We talked about how to count when it was in this picture form in order to make sure that we had gotten all of the rabbits and not counted some more than once.  We brainstormed several ideas and then as a class decided that grouping them in circles of tens would be the best.

The kids then went and opened up the "Educreations" app and put the photo of the rabbits into it and then went to work.  When they were finished they saved their work to their photo gallery.  Below is a sample of a finished picture.  


I then projected the students work up onto the screen and we looked to see all of the different ways that the students chose to count their rabbits.  We also talked about what was easy and what was hard about this.  In most cases the students counted correctly.  We looked in the book at the page the picture came from to see what the number was.

This was a very fun first attempt at going paperless.  My takeaway from it was that it was really easy to take a quality picture of a worksheet and have the kids use it.  It's also pretty easy to save and look at later.  I like that the kids can save it and also re-look at it later to self assess.  Finally, I am finding more and more uses for "Educreations".  What a great, diverse app and it's FREE!!!!


Sunday, April 29, 2012

Word Work and EduCreations App

We use Daily 5 during our literacy block and we use the "Words Their Way" method for our word study, so one of the choices during the Daily 5 is "Word Work".  Each week my students are given a new list of words that are based on the  features they need to be working on.  My classroom is differentiated, so their are 3 different Word Study groups.  Although they may have different words, the work and expectations of the students looks pretty much the same across the 3 groups.  As I slowly introduced the iPads into the classwork, I found a way to have the students complete sorting and reading their words in a new fun and engaging way.


We use the app "Educreations".  It is free and it allows the students to "draw" their words and then record themselves reading the list.


Below is an example of a student's work in this app.  After the child writes the sort, he/she taps the record button and reads the word sort.  Then they hit the save button.  This sends the picture and recording in to the app for future use.


When they are finished saving, I have them listen to themselves and think about what they heard.  This self assessment is very powerful.  The recording also shows the time it takes and I've heard several comment on this.  The draw back to this app is that the student cannot go back and re-record after they have saved it.  Plus, if the recording has an error, then the whole thing is lost and they must start over again.  This happened several times but we still like using this app, so we just deal with it.  I hope this glitch gets fixed by the designer soon.  I have the students complete this assignment 2 times in the week.  Once at the start and again at the end of the week.  This way they can hear the difference and see how practice has improved their fluency and speed.  

My take away from this is that when I have the students read their words as they sort and then read them again for a partner, they are working on fluency, which is great, but when they listen to themselves read, they are working on self assessment.  I've watch my students pause on a word that they heard themselves say slowly or wrong and they catch it and then practice saying it correctly.  When they do this as just a read, they may not catch their errors but when they listen to themselves it is so much more powerful!

Wednesday, March 28, 2012

The Magic Pot and Screen Chomp

I've been working on addition and subtraction Math facts and thought I'd try a fun way to work on the doubles facts using the iPads.  I started out by reading the book "Two of Everything" by Lily Toy Hong to the kids.


It's a fun story about a magic pot that doubles whatever is put in it.  We've been working on our doubles facts so the kids already got this concept.  

I chose the "Screen Chomp" app for the kids to use in this project.  I wanted to try this app because I liked the way the whole screen could be used and the way the kids could record their voices either while they were drawing or after.  I also liked that I could save it in Safari window thereby enabling me to have a URL of the kids work.  This will be important later. 
I showed the kids how to draw a magic pot and told them that they needed to think of their favorite thing that they would put into the magic pot and to draw it.  I also told them that they had to use a number between 2 and 10, so if they liked pizza then they could draw 2 or up to 10 pizzas to put in the pot.  They were also told to label the drawing with the number and what went into the pot.

The next part was to make their recordings.  I showed them how to do it and then said they could work with a friend if needed but none of them chose to work this way.  They feel very confident and went right to work.  I said that I wanted the recording to say "I put ____ into my magic pot, how many came out?"  This was done and now I showed them how to save it into the "Screen Chomp" app.

Now, the rest of the work was mine. I am sure there is an easier way to do what I am about to tell you, but since I have no one to collaborate with, it's all up to me to figure this out.  This was the best I could do for now and hope to find an easier way soon. 

 I needed to go into each kids iPad Screen Chomp app and open up the work they did.  Once it was opened, I chose the button in the lower right corner that says "Open In Safari".  Once it was opened I took a screen shot.  It was this or write down the URL's but I was afraid that if I didn't write it down correctly I'd have to go back through all of this again, so better safe than sorry.  Once I had the screen shot, I went to my Evernote app.
I opened up the Evernote and put the photos from Screen Chomp into here.  Now I had all of the URL's for the kids work.

My next step: make QR codes using the kids work!  It would have been super easy if I could just cut and paste the URL's but that wouldn't work, so I had to write then all down and did make some mistakes along the way, so I'm glad they were saved in Evernote.

Here is a QR code from one of the kids work.

I made a packet that had 3 QR codes per sheet along with a box to draw the problem and a place for the equation.  I staggered the codes to help the kids scan easier.  It was so rewarding to hear their squeals of delight as they found their own and their friends codes. 

My takeaway from this adventure is that "Screen Chomp" is a very kids friendly app that has so much potential for future use.  I love that it has the safari option, I haven't found that in other apps that I have.  The kids were able to get to work right away with minumal instruction and saving was very easy.  I'm definitely using this one again!


Sunday, March 25, 2012

Assigning iPads with QR Codes

I had the kids sit up on the floor with me as I projected on the screen how to take pictures using an iPad.  That had some experience with this the other day, but now I was having them work with their own iPad and take pictures of each other using the camera.  We also practiced using the button that changes the direction of the camera and taking pictures.  Taking pictures was actually hard for the kids because it's kind of an awkward setup.  The iPad is big and the protective case is hard to hold and can get in the way.  But we kept trying it and the kids soon figured out the best way to hold the iPad when taking pictures that was worked for them.  I worked in small groups doing this so that I could be more hands on. Again, it would be nice to have Apple TV!


Now we were ready to learn about QR codes.  These kids are around them all of the time and they all could tell me places they have seen them but they didn't know what they were used for.  We had a talk about them and then I explained how to read one.  The app that I like is the QR Reader for iPhone. 
It's simple to use and read after the code has been scanned plus it's free.  The graphics that it opens up looks like a yellow, lined pad of paper.  I find that this is easier for the kids to read.

I made several QR codes for the kids to practice scanning with that had fun messages like "Yes, you did it!" and a "Knock Knock" joke plus one that said show me the message for a treat.  They had a lot of fun with this. 
Now we were ready for our name hunt.  I had made each child's name into a QR code using "qurify"
There are several out there and I'm not saying any is better than the other, I just like this one.  You type the message, or put an URL into the blue box and hit "qurify" and it generates a QR code.
When you go to the print queue, all of the codes that you have made at that time appear with a number above it.  There is also a list of the codes and what they say.  Very handy feature.  

I cut out the codes and taped them in a random order on all of the tables.  I had the kids work in pairs and they were given a paper that had numbers 1 to 20.  They were to go to a QR code, scan it and write the child's name that appeared on the paper in the number that the code was.  They had so much fun scanning and finding all of the class names.

When everyone was finished and we had all of the names, I told the kids that this would be their number from now on.  I called out a child's name and asked them what number they had on the iPad they were using.  When the number was said we all looked on our papers to see who was that number.  Then I told the first child to deliver the iPad to that person. We continued around the room until everyone had "their" iPad.  Again the excitement level was sky high....their "own" iPads!!!!!!!!  


Now we are ready for our next adventure.